Overview
Examine transcript to mark-up sections that will become each individual movie. Each movie will correspond to a text section equaling approximately one full paragraph. Most often, an individual movie will be a distinct paragraph, but many times individual movies will be a combination of question-answer-question-answer segments when it makes contextual sense to keep these exchanges between interviewer and interviewee as one movie "chunk." Each movie file—corresponding to each paragraph-length equivalent text—should be roughly two minutes long. Strive to keep most movies somewhere between 1-3 minutes, erring on the side of LONGER clips when the content spoken contextually makes sense as a single unit.
Directions
- Print out the full transcript of the interview.
- Beginning at the start, mark up with pen/pencil each paragraph-length equivalent “chunk” of text. Most interviews begin with the interviewees introducing themselves with. “My name is XXX, my name is YYY, today is …… and we are here interviewing ZZZZ …. “ This becomes the first “paragraph” and therefore the first movie. Note that this is generally one of the exceptions in length – as this one will be very short.
- Label each “chunk” on the transcript. The name will be used later as the name of the movie “clip” that you will craft using QuickTime. Use the following naming convention:
For FIRST interviews append with an “a”:
Example:
001a, 002a, 003a…………025a, 026a……..103a, 104a, etc.
For SECOND interviews, append with a “b”:
Example:
001b, 002b, etc.
- Continue through the entire transcript, marking up combinations of related questions and answers together, and labeling these chunks for future movie file creation.
Creating Quicktime Reference Movies
Using Apple’s Quicktime Pro software, create the individual movies that correspond to each paragraph-length equivalent text using the mark-ups completed above.
Quicktime Pro must first be enabled. Quicktime Pro is a licensed upgrade to Quicktime Player and unlocks several editing tools necessary for this step. Contact Howard if you need this. All Urban School teachers and students already have “Pro” – be sure to use “Quicktime Player 7” and NOT the newer “Quicktime Player.”
The hard drive given to you by Howard should contain a folder of the full-size/full-quality original movie files of the entire interview you are working on. You use these “master” movie files to create the shorter “reference” movies. Watch the tutorial movie in addition to reading the directions below. (coming soon)
- Create or verify that the hard-drive has a folder named “reference-movies” (or something very similar). Make sure this lives just outside of the same master folder that contains the full-size/full-quality original movie files.
- Open the first movie using “Quicktime Player 7” - this should start with the interview introduction sequence.
- Press “play” to advance to the very BEGINNING of the first desired movie clip.
- Fine-tune frame-by-frame using the left and right arrow keys – watch eyes and lips to find the very best STARTING point.
- Press “o” to establish the “out” point. You have now SELECTED all the movie segment that is “garbage.”
- Press “delete” to cut out the unnecessary video.
- Press “play” to advance to the very END of the first desired movie clip.
- Fine-tune frame-by-frame using the left and right arrow keys – watch eyes and lips to find the very best ENDING point.
- Press “command-X” to CUT this segment.
- Press “command-n” to create a NEW blank movie file.
- Press “command-v” to PASTE in the desired segment.
- Check for accuracy/precision of the start and end points of this movie and fix if necessary.
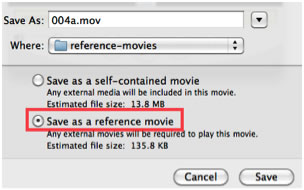 Press “command-w” to prompt a CLOSE of the file – you will be prompted to SAVE the file. Press “command-w” to prompt a CLOSE of the file – you will be prompted to SAVE the file.- Name the movie file with the same name as on the transcript – be sure to append “.mov” -- thus, “001a.mov” for the first movie of interview #1, “002a.mov” for the second, and so on.
- Be sure to click the “Save as reference movie” check-box
- Locate the folder named “reference-movies” from Step 1 above and save the file in this folder.
Repeat these steps for every movie. This is cumbersome at first, but will move very quickly after creating the first few.
A Few Recommendations/Tips Using QuickTime Pro
- Never the mouse to move the selection triangles to establish the in and out points – instead always use the PLAYHEAD to advance to the specific location and set the in and out points using “i” and “o”
 NEVER save the edited original full-size/full-quality original movie files – only save the newly created reference files – when you are done cutting up the original files, close and choose “Don’t Save” NEVER save the edited original full-size/full-quality original movie files – only save the newly created reference files – when you are done cutting up the original files, close and choose “Don’t Save” - Work from left-to-right on the movie timeline keeping your “in” point always at the very beginning – i.e., keep deleting “garbage” and cutting desired clips.
Commands Helpful When Using QuickTime Pro
i = set the IN point
o = set the OUT point
Command-x = cut highlighted segment
Command-v = paste the cut segment
Command-n = make new Quicktime file
Command-w = close and prompt to SAVE file
SPACEBAR – starts and stops video at point of the playhead
Right and left arrows = moves tracker frame by frame
Less used:
SHIFT-right arrow = moves selection triangle in line with PLAYHEAD
OPTION-right (or left) arrow = jumps the tracker from beginning to end of the selections (as well as beginning and end of the whole movie)
|